Saturday, August 3, 2013

Sweet Corn Masala

Corn Masala  or Corn Chaat is a very simple healthy and flavorful recipe which can be prepared as a evening snack item for Ur kids. As rainy season started every one wants to eat hot n spicy evening snack items Corn masala is the best one. Corn which is rich in fiber helps to reduce constipation problems. So today we will see hoe to make this healthy, mouth tingle snack preparation at home.


Cooking Time - Under 10 minutes
Serves - 1-2

Ingredients
Sweet Corn - 1 cup heaped
Butter - 2 tsp
Garam/Chaat Masala - a pinch
Red Chilli Powder - less than 1/4 tsp
Salt as required
Few drops of fresh Lemon juice

Preparation
Wash and steam corn with little salt. You can also boil corn in a little water to make it soft. (If Ur using pressure cooker add some water to corn and keep flame on high and wait for 3 whistles.)

Procedure
Melt Butter, add cooked corns, salt needed, garam/chaat masala powder and saute for 2-3 seconds.

Remove from flame and add lemon drops.

Serve hot.


Note :
You can substitute garam masala with pepper powder.

Frozen corn or Indian corns can also be used to prepare this recipes.

Hope U enjoyed this recipe. Leave Ur valuable comments about this recipe. I wish U a safe and yummy cooking :-).

If you found this post useful, kindly consider linking  to it or sharing it with others or like us on Facebook or follow me on Twitter or join me on GooglePlus to keep up to date with yummy-day.

Sunday, July 21, 2013

Home Made Khoya

Khoa, Khoya is a milk food widely used in Indian cuisine made of either dried whole milk or milk thickened by heating in an open iron pan. It is one of the most famous and a classic ingredient in Indian cooking where it is used both for savory as well as sweet dishes. The richness that it adds to the sweets is indescribable. Delicious homemade khoya is always healthy and tasty. It is not as hard as you might think and it keeps well in the fridge. See these steps to realize what a simple process this whole Khoya making business is. Trust me - you will never buy store varieties ever again!


Lets see quick and tasty home made khoya.

Preparation Time - under 15 min
Cook Time - 2-3 hrs
Yield - 1-11/2 cup

Ingredients
Milk - 1 liter (full fat)

Procedure
Take the 1 liter milk in a heavy bottomed wide mouthed vessel or kadai. In Medium-High heat bring it to boil (Takes 10 minutes) [Stay near the stove and be watchful if you work with medium-high heat. If you have a non-stick vessel you can use since milk will scorch in later stages of cooking.]


Once the milk boils, reduce flame to Medium-Low. Scrap the sides of the vessel and stir the content from time to time.


In next 20 minutes, the milk reduces to half. Remember to stir and scrap the dried milk from time to time.

In next 15-20 minutes, the milk again halves changing into a pale yellow color. Take extra care from this stage since the milk tends to burn/scorch very fast if you’re careless watching it. So stir and scrap the milk solids very frequently. In this stage most of the water vaporizes from the milk turning it into a thick consistency with a granular texture. Here if U want to make sweet khoya add sugar and in this stage and mix well.


In next 10 minutes, the milk starts to solidify. Turn flame to Low since the solidifying milk can quickly get burnt if overlooked. Do not forget about stirring frequently


In next 10 minutes the color of the milk changes to creamy yellow and thickens more.

In next 5-10 minutes, almost all of the water content evaporates from the milk and solidifies the milk completely. Now, when you stir, the content stir together firmly into a single mass. Switch off the stove.


Khoya is ready to use. 


Hope U enjoyed this recipe. Leave Ur valuable comments about this recipe. I wish U safe and yummy cooking :-).

If you found this post useful, kindly consider linking  to it or sharing it with others or like us on Facebook or follow me on Twitter or join me on GooglePlus to keep up to date with yummy-day.

Friday, July 19, 2013

Gongura Pachadi (Red Sorrel Leaves)

Gongura pachadi is quintessentially Telugu cuisine. While it has many culinary uses, the most popular is the pickled version. Although Gongura is widely consumed all over Andhra Pradesh, Guntur Gongura is more popular. Gongura is a very rich source of Iron, vitamins, folic acid and anti-oxidants essential for human nutrition. Gongura comes in two varieties, green stemmed leaf and red stemmed. The red stemmed variety is more sour than the green stemmed variety. I made this Pachadi with red stemmed variety. We can store this for 2-3 weeks in refrigerator.


Lets see the preparation of this mouth tingling recipe.

Ingredients
Gongura Leaves - 4 bunches (red sorrel)
Red Chilli - 8
Methi Seeds - 1tsp
Green Chilli - 7-8 (less spice)
Urad Dal - 1 tsp
Mustard Seeds - 1/2 tsp
Channa Dal - 1/2 tsp
Hing - a big pinch
Oil - 5 tsp
Garlic Cloves - 12 -15 
Salt as required

Procedure
Separate the gongura leaves from the stalks and leave them in an open cool and dry place for 2 days so that the leaves wither.After 2 days wash the leaves.Spread over kitchen towel.

Heat 2-3 tsp of oil in a heavy bottomed vessel. Add the leaves, slit green chillies and fry them till rawness disappears and they must be soft. Switch off flame and cool the entire content. It should be look as shown in below picture.


Now heat  2 tsp of oil in a pan and add mustard seeds and let them pop. After that add methi seeds, urad dal, chana dal, hing, red chilli pieces and fry stirring constantly till light brown. Remove from flame and cool it.

Grind these above ingredients with salt. After that add fried leaves and crushed garlic and grind very coarsely (we can also make it into smooth that's Ur choice :-))


Yummy Gongura Pachadi is ready to eat. Serve with hot rice.

Note:
I have used the red stemmed variety of leaves which is more sour than the green stemmed.If you are using the leaves of the green stemmed variety, you can add approx 1-2 tbsp tamarind extract while grinding the ingredients.

Hope U enjoyed this recipe. Leave Ur valuable comments about this recipe. I wish U a safe and yummy cooking :- ).

If you found this post useful, kindly consider linking  to it or sharing it with others or like us on Facebook or follow me on Twitter or join me on GooglePlus to keep up to date with yummy-day.

Thursday, July 18, 2013

Tomato Perugu Pachadi - Tomato Yogurt Chutney

Yogurt based chutneys are an integral part of South Indian cuisine and in Andhra we prepare a range of these chutneys using vegetables, either cooked or raw. Preparation of these chutneys are very simple and tasty. Imagine the taste of red tomatoes saute with seasoning, grated coconut and green chillies WOW!!! delicious chutney. So don't miss this recipe :-).


Lets see the preparation of this chutney.

Preparation Time - 10 mins
Cooking Time - 10 mins
Serves - 3-4 persons

Ingredients
Yogurt - 2 cups
Ripe Tomatoes - 2 (large)
Onion - 1 (big)
Green Chilli - 1
Coriander Leaves - 1 tsp
Grated Coconut - 1/4 cup (optional)
Turmeric Powder - a pinch
Salt as required

For Seasoning
Mustard Seeds - 1/2 tsp
Cumin Seeds - 1/2 tsp
Vamu - a big pinch
Red Chilli - 1
Oil - 1 tsp

Procedure
Heat oil in a pan. Add mustard seeds and let them pop. Then add cumin seeds, vamu and red chilli. Saute for few seconds.

Now add chopped green chilli, onion pieces and fry till transparent. Now add turmeric powder and salt.

Add the chopped tomatoes and cook for 6-8 mts or till they turn soft but not mushy. Turn off heat and cool.


Beat the yogurt till smooth and add grated coconut to it. Combine the cooked tomato mixture with the beaten curd and garnish with fresh coriander leaves.

Yummy Tomato Perugu Pachadi - Tomato Yogurt Chutney is ready to eat. 
 

Serving Suggestions :
Serve withe hot rice, roti and podina rice/mint rice.
Hope U enjoyed this recipe. Leave Ur valuable comments about this recipe. I wish U a safe and yummy cooking :- ).

If you found this post useful, kindly consider linking  to it or sharing it with others or like us on Facebook or follow me on Twitter or join me on GooglePlus to keep up to date with yummy-day.
- See more at: http://yummy-day.blogspot.in/#sthash.IYa0g98t.dpuf


Hope U enjoyed this recipe. Leave Ur valuable comments about this recipe. I wish U a safe and yummy cooking :- ).

If you found this post useful, kindly consider linking  to it or sharing it with others or like us on Facebook or follow me on Twitter or join me on GooglePlus to keep up to date with yummy-day.

Monday, July 15, 2013

Aratikaya Bajji - Raw Platina Fritters

It is pouring cats and dogsssssssssss.... In this kind of weather I can just imagine hot hot bajjis :-). So I prepared this bajjis and enjoyed first rain of this season. 


Lets see the preparation of this yummy bajjis.

Preparation Time - under 10 mins
Cooking Time - under 15 mins
Serves - 2

Ingredients
Raw Platina - 1
Besan - 1 cup
Rice Flour - 1 spoon
Baking Soda - a pinch
Red Chilli Powder - 1 tsp
Salt as required
Oil for deep fry

Procedure
Take a bowl. In that add besan, salt, red chilli powder, baking soda and rice flour. Mix all these ingredients with required water. Batter consistency must be medium thick.


Now chop plantina into round shape and put them in water so that color will not change.


Heat oil in a kadai. Once the oil is hot, dip the plantina into batter and place it in the oil. Turn on both sides. Once they turn golden brown color remove them from oil and strain oil.


Tasty crispy bajjis are ready to serve.

Serving Suggestions:
Serve with ketchup or sprinkle chat masala or cut the bajji in middle and stuff finely chopped onion pieces and lemon juice.

Hope U enjoyed this recipe. Leave Ur valuable comments about this recipe. I wish U a safe and yummy cooking :- ).

If you found this post useful, kindly consider linking  to it or sharing it with others or like us on Facebook or follow me on Twitter or join me on GooglePlus to keep up to date with yummy-day.
- See more at: http://yummy-day.blogspot.in/#sthash.rJj9sYRd.dpuf
Hope U enjoyed this recipe. Leave Ur valuable comments about this recipe. I wish U a safe and yummy cooking :- ).

If you found this post useful, kindly consider linking  to it or sharing it with others or like us on Facebook or follow me on Twitter or join me on GooglePlus to keep up to date with yummy-day.
- See more at: http://yummy-day.blogspot.in/#sthash.yzubOooK.dpuf
Hope U enjoyed this recipe. Leave Ur valuable comments about this recipe. I wish U a safe and yummy cooking :- ).

If you found this post useful, kindly consider linking  to it or sharing it with others or like us on Facebook or follow me on Twitter or join me on GooglePlus to keep up to date with yummy-day.
Hope U enjoyed this recipe. Leave Ur valuable comments about this recipe. I wish U a safe and yummy cooking :- ).

If you found this post useful, kindly consider linking  to it or sharing it with others or like us on Facebook or follow me on Twitter or join me on GooglePlus to keep up to date with yummy-day.
- See more at: http://yummy-day.blogspot.in/#sthash.rJj9sYRd.dpuf
Hope U enjoyed this recipe. Leave Ur valuable comments about this recipe. I wish U a safe and yummy cooking :- ).

If you found this post useful, kindly consider linking  to it or sharing it with others or like us on Facebook or follow me on Twitter or join me on GooglePlus to keep up to date with yummy-day.
- See more at: http://yummy-day.blogspot.in/#sthash.yzubOooK.dpuf
Hope U enjoyed this recipe. Leave Ur valuable comments about this recipe. I wish U a safe and yummy cooking :- ).

If you found this post useful, kindly consider linking  to it or sharing it with others or like us on Facebook or follow me on Twitter or join me on GooglePlus to keep up to date with yummy-day.
- See more at: http://yummy-day.blogspot.in/#sthash.yzubOooK.dpu
Hope U enjoyed this recipe. Leave Ur valuable comments about this recipe. I wish U a safe and yummy cooking :- ).

If you found this post useful, kindly consider linking  to it or sharing it with others or like us on Facebook or follow me on Twitter or join me on GooglePlus to keep up to date with yummy-day.
- See more at: http://yummy-day.blogspot.in/#sthash.yzubOooK.dpuf

Saturday, July 13, 2013

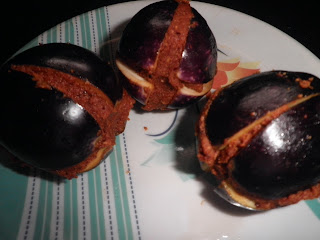
Gutti Vankaya Kura - Stuffed Brinjal Curry

After a short gap came up with a new look and famous Andhra side dish i.e., Gutti vankaya kura. This recipe is a must and should dish in marriages. We can make it in different ways by changing stuffing. I will try to post few more different stuffing with brinjal. My mom used to prepare this curry with coriander, ginger and green chilli paste but today I am going to post this curry with different stuffing. 


Lets see the preparation of this recipe.

Preparation Time - 15min
Cooking Time - 15 min
Serves - 3

Ingredients
Brinjal - 5 (medium or small size)
Oil - 4 tsp

For Stuffing 
Onion - 1 (big size)
Coriander Seeds - 1 1/2 tsp
Urad Dal - 1 1/2 tsp
Channa Dal - 1 tsp
Jeera - 1 tsp
Mustard Seeds - 1/4 tsp
Red Chilli - 2
Tamarind - 4-5 gms
Turmeric - a pinch
Hing - a pinch
Salt as required

Procedure
First heat 2 tsp of oil in a kadai. Then add channa dal, urad dal, coriander seeds, jeera, mustard, red chilli, tamarind and hing. Cook till they turn into golden color.


Bring the hole content into room temperature. Mean while chop onion into big pieces and chop brinjals as shown below


Now grind the above cooked ingredients and onion into a smooth paste by adding required salt.


Then start stuffing this paste into brinjal. 


Heat 2 tsp of oil in kadai. Add stuffed brinjals and remaining paste to it and sprinkle water.


Close the lid for some time. Mean while stir the whole content. Repeat it until brinjals become smooth.


Tasty Gutti Vankaya kura (Stuffed Brinjal Curry) is ready to eat.


Serving Suggestions:
Serve with HotRice.     

Hope U enjoyed this recipe. Leave Ur valuable comments about this recipe. I wish U a safe and yummy cooking :- ).

If you found this post useful, kindly consider linking  to it or sharing it with others or like us on Facebook or follow me on Twitter or join me on GooglePlus to keep up to date with yummy-day.

Monday, July 8, 2013

Annavaram Prasadam-Cracked Wheat Halwa

As soon as one hears the word Annavaram Prasadam, the mouth starts watering, it is so delicious. It is a sweet made of jaggery, cracked wheat and ghee. It is a most favoured prasadam at the temple Annavaram located in Andhra pradesh and is mostly known as Anavaram Satyanarayana Murthy Prasadam, the offering to the Lord Satya Deva. For preparing this prasadam the method is very easy and the ingredients are also easily available at home.


Lets see the preparation of this prasadam.

Ingredients
Cracked Wheat: 1 cup (Godhuma Rava)
Water: 3 cups
Jaggery: 1 ¼ cup
Sugar: ½ cup
Cashew: Handful
Ghee: 3 tablespoons
Cardamom Powder: ½ spoon (Elaichi / Yaalakkaya)  

Procedure
Add water in pan and boil it.


When water starts boiling add cracked wheat. cook it till water evaporates.


Add Jaggery and Sugar into the pan and stir the content.


Cook until jaggery and sugar melts and content comes closer.


Add cardamom to the above content.

Meanwhile fry the cashews in the ghee and add fried cashews along with ghee to the content and mix it.

Transfer it into a bowl and garnish with fried raisines, almonds and khajus. Prasadam is ready for Nyvedyam.


Hope U enjoyed this recipe. Leave Ur valuable comments about this recipe. I wish U a safe and yummy cooking :- ).

If you found this post useful, kindly consider linking  to it or sharing it with others or like us on Facebook or follow me on Twitter or join me on GooglePlus to keep up to date with yummy-day.

Tuesday, July 2, 2013

Poppy SeedsTindoora Fry - Gasagasalu Dondakaya Gutti Kura

Tindoora/Ivy gourd lovers will enjoy today’s dish. A perfect stuffing recipe that couldn’t get any better. You will need good quality, tender tindora to prepare this dry saute. Does take some time to roast but is worth the wait as the more tindora roasts, the more its infused with flavor. :) Classic stuffed vegetable at its best!


Lets see the preparation of this recipe.

Ingredients
Dondkayalu/Tindoora - 1/4 kg
Khus Khus/poppy seeds - 3 tsp
Red Chilli - 2
Salt as required
Oil - 3 tsp
Water - 1/4 cup

Procedure
First chop ends of tindoora and cut +slit length wise for stuffing.

Now add water to this pieces and boil for 15 minutes.

Fry Poppy seeds(gasagasalu/khus khus) and red chilli without oil. Fry until they turn into golden brown color. Bring it to room temperature and grind it into powder.


Now heat 3 tsp of oil and fry boiled tindoora.


Then stuff the grounded powder into this fried tindoora.

Yummy Poppy Seeds Tindoora fry is ready to eat.


Hope U enjoyed this recipe. Leave Ur valuable comments about this recipe. I wish U a safe and yummy cooking :- ).

If you found this post useful, kindly consider linking  to it or sharing it with others or like us on Facebook or follow me on Twitter or join me on GooglePlus to keep up to date with yummy-day.


Related Posts Plugin for WordPress, Blogger...

ShareThis